Privacy Portal
Privacy Portal is available for the listed account plans only.
See the available plans, or contact Support.
When preparing for new privacy regulations (like HIPAA, the GDPR, or the CCPA), the best practice is to create a comprehensive data inventory which includes details about what personal information you collect, where you collect it from, where you store the data, and who has access to it. The Privacy Portal helps automate this process for the data you collect with Segment.
When you use Segment as the single point of collection for your customer data, you can use the Privacy Portal to:
- Automatically detect and classify your customer data to create a dynamic data inventory
- Monitor changes to your inventory with real-time alerts
- Enforce your company’s data privacy policies with standard privacy controls
- Streamline regulatory compliance with tools for user deletion and suppression
Privacy Portal features are available to all Segment workspaces, however only workspace owners can access the Privacy Portal.
Privacy Detection
The Detection page in the Privacy Portal is where you can find out more about exactly how data is being detected and classified in your workspace. You can think of it as the brain behind the entire Privacy Portal, filled with the logic that detects and classifies the data in the first place.
On this page, you can also modify your Detection settings and tell Segment how you want us to match data, so that it is meets your unique business needs.
Default PII Matchers
Out of the box, the Privacy Portal contains matchers for the most common PII fields. These matchers scan data coming from your Sources for PII based on both exact-matching (looking for an exact match, such as a field name) and fuzzy-matching (looking for both exact matches, and any values which are similar).
In this section of Segment’s Privacy Portal, you can see the fields we match against by default. The display lists whether we match on the key (for example the label “CCN”) or value (for example, the payload 123-456-7890) in the Matches On column. You can also see how we classify these matchers by default in the Default Classification column.
Below is a full list of automatically detected restricted fields.
| Matcher | Classification |
|---|---|
| social security number | red |
| password | red |
| visa | red |
| veteran | red |
| disability | red |
| credit card | red |
| passport | red |
| token | red |
| race | yellow |
| birthdate | yellow |
| phone | yellow |
| address | yellow |
| gender | yellow |
| ethnicity | yellow |
| citizenship | yellow |
| name | yellow |
| street | yellow |
| city | yellow |
| zipcode | yellow |
| yellow | |
| certificate | yellow |
| license | yellow |
| identification | yellow |
| serial | yellow |
| ip | yellow |
| photo | yellow |
| salary | yellow |
| religion | yellow |
| yellow | |
| mac | yellow |
| sex | yellow |
| gender | yellow |
| sexual orientation | yellow |
| medication | yellow |
| allergy | yellow |
| condition | yellow |
| diagnosis | yellow |
| procedure | yellow |
When Segment detects data that meets the criteria for one of the default matchers (in the list above) in properties in your Web, Mobile, Server, or Cloud Event Sources, we display it in the Privacy Portal Inbox.
Custom PII Matchers
This is where you can create your very own matchers to tell Segment what to scan
for in your workspace. You can use this feature to detect properties that are
unique to your company or region, or that aren’t already handled by the default
matchers above. You can have up to 100 custom matchers per workspace. Custom
Matchers detect data in your Web, Mobile, Server, and Cloud Event Sources for
fields under context, traits and properties objects, and
the data they detect appears in the Inbox.
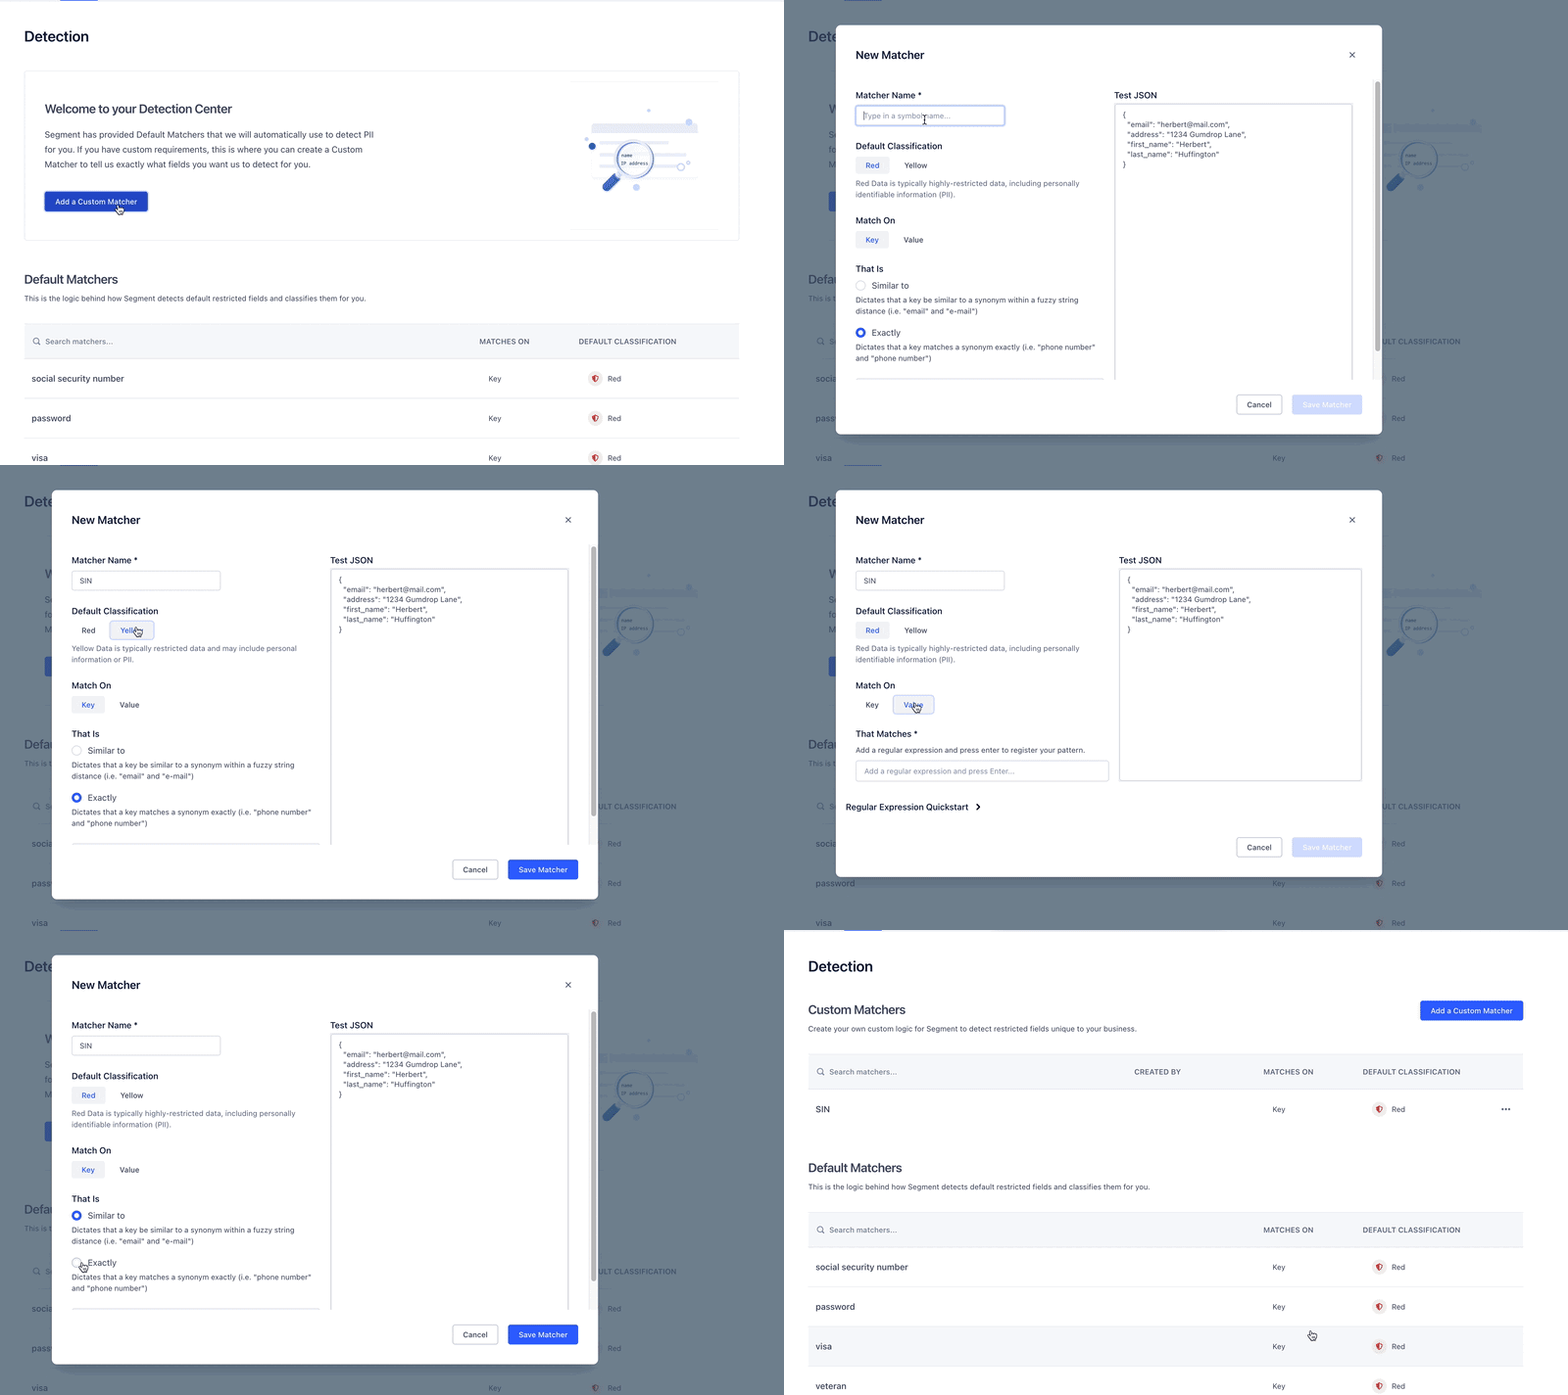
For example, if you have a restricted data point at your company called “SIN” (for “social insurance number”) you can tell Segment’s Privacy Portal how to treat that property whenever it is appears in data Segment processes.
To create a Custom Matcher:
- Click Add a Custom Matcher.
- Enter the Matcher Name (for example the property name, like “Social Insurance Number”). Segment matches against the Matcher Name, as well as the other context you provide in the next steps.
- Set the default classification:
- Red for highly restricted
- Yellow for moderately restricted
- Choose whether to match on a Key (for example, “SIN”, “Social Insurance Number”, “Social Insurance No.”, “SocInsNo”) or on a Value (for example. “123-456-789”, “1234567”)
- Select how precise the match should be, by choosing Exact or Similar match.
- Exact matches mean that a key matches the term exactly (for example “phone number” but never “phne number”)
- Similar to matches a Key that is similar to a term within a fuzzy string distance (for example “email” and “e-mail”). We built fuzzy matching using this public GitHub repository. If the score is > 0.7, then we say it’s a match.
Unless the field value pattern is unique, we recommend matching on the Key. For example, for Credit Card Number, it’s better to detect on Keys that look like “CCN” or “Credit Card Number” instead of trying to detect any values that look like “1234567890”, because a 10-digit string can be found in all kinds of data even when it’s not an CCN. For example, the key “Product_ID” could contain a 10-digit string, even though Product_ID does not actually contain an SSN. A North American phone number (without country code) is also ten digits.
An intro to Regular expressions
Custom Matchers use regular expressions (using the Golang Regex Package) to provide you great flexibility for your matching patterns.
Regular expressions (or regexes) are a way to describe to a computer a pattern that we’re looking for, using a series of special symbols. For example, if we want to match all Gmail emails, we’d write the following regex:
@example.com
This pattern matches jane@example.com, mike@example.com and so on. Regular
expressions can also contain special symbols. One of them is \d and it tells
the computer to match a single-digit number. In that case, regular expression
Number \d would match Number 1, Number 2 and so on. You can match multiple
digits by adding a plus sign (+) at the end: Year \d+. This pattern would
match Year 2019, Year 2020, etc.
If you need to match a specific word, you can type the word without any
modifiers. For example, a regular expression of Apple would only match strings
that contain Apple. You can also change it to match all Apple or Orange
words, by separating the search terms with a “pipe” character, like so:
Apple|Orange.
Regular expressions have much more flexibility than we can describe here. Check out the following resources to learn more about regular expressions so you can build new custom matchers:
- RegExr - an online tool to experiment with regular expressions and test them
- RegexOne - a tutorial which takes you from regular expression basics to advanced topics
- Regexp Cheatsheet - a handy cheatsheet to have nearby when you’re writing regular expressions
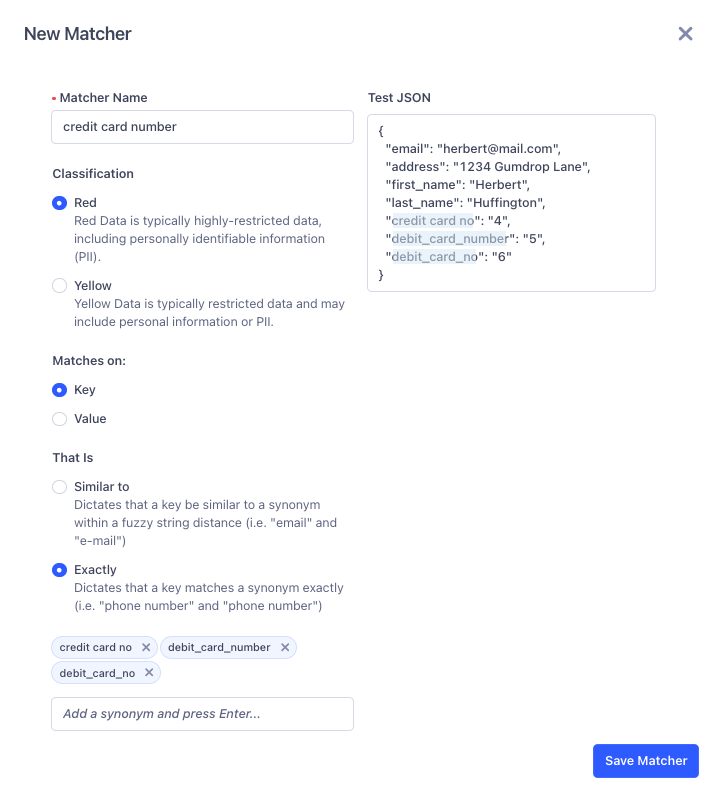
Using Synonyms
Segment’s exact matching and fuzzy matching do not detect all variations in the received keys
and for those scenarios, you can use synonyms. For example, for the value credit card number, you can add credit card no,
debit card number, debit card no, or similar variations in the synonyms section to classify those fields.

Privacy Inbox
The Inbox helps you keep track of new restricted data types as they are captured, quickly classify them, and build a data Inventory.
Segment detects these fields by scanning data from your Web, Mobile, Server, and Cloud Event Sources to detect PII based on the default PII matchers. New properties sent into Segment appear in the Inbox in realtime.
When you view the Inbox, it displays every property that was sent into Segment from Web, Mobile, Server, and Cloud Event Sources for the past 7 days. (Object Cloud Sources and Reverse ETL Sources do not appear in the Inbox at this time.)
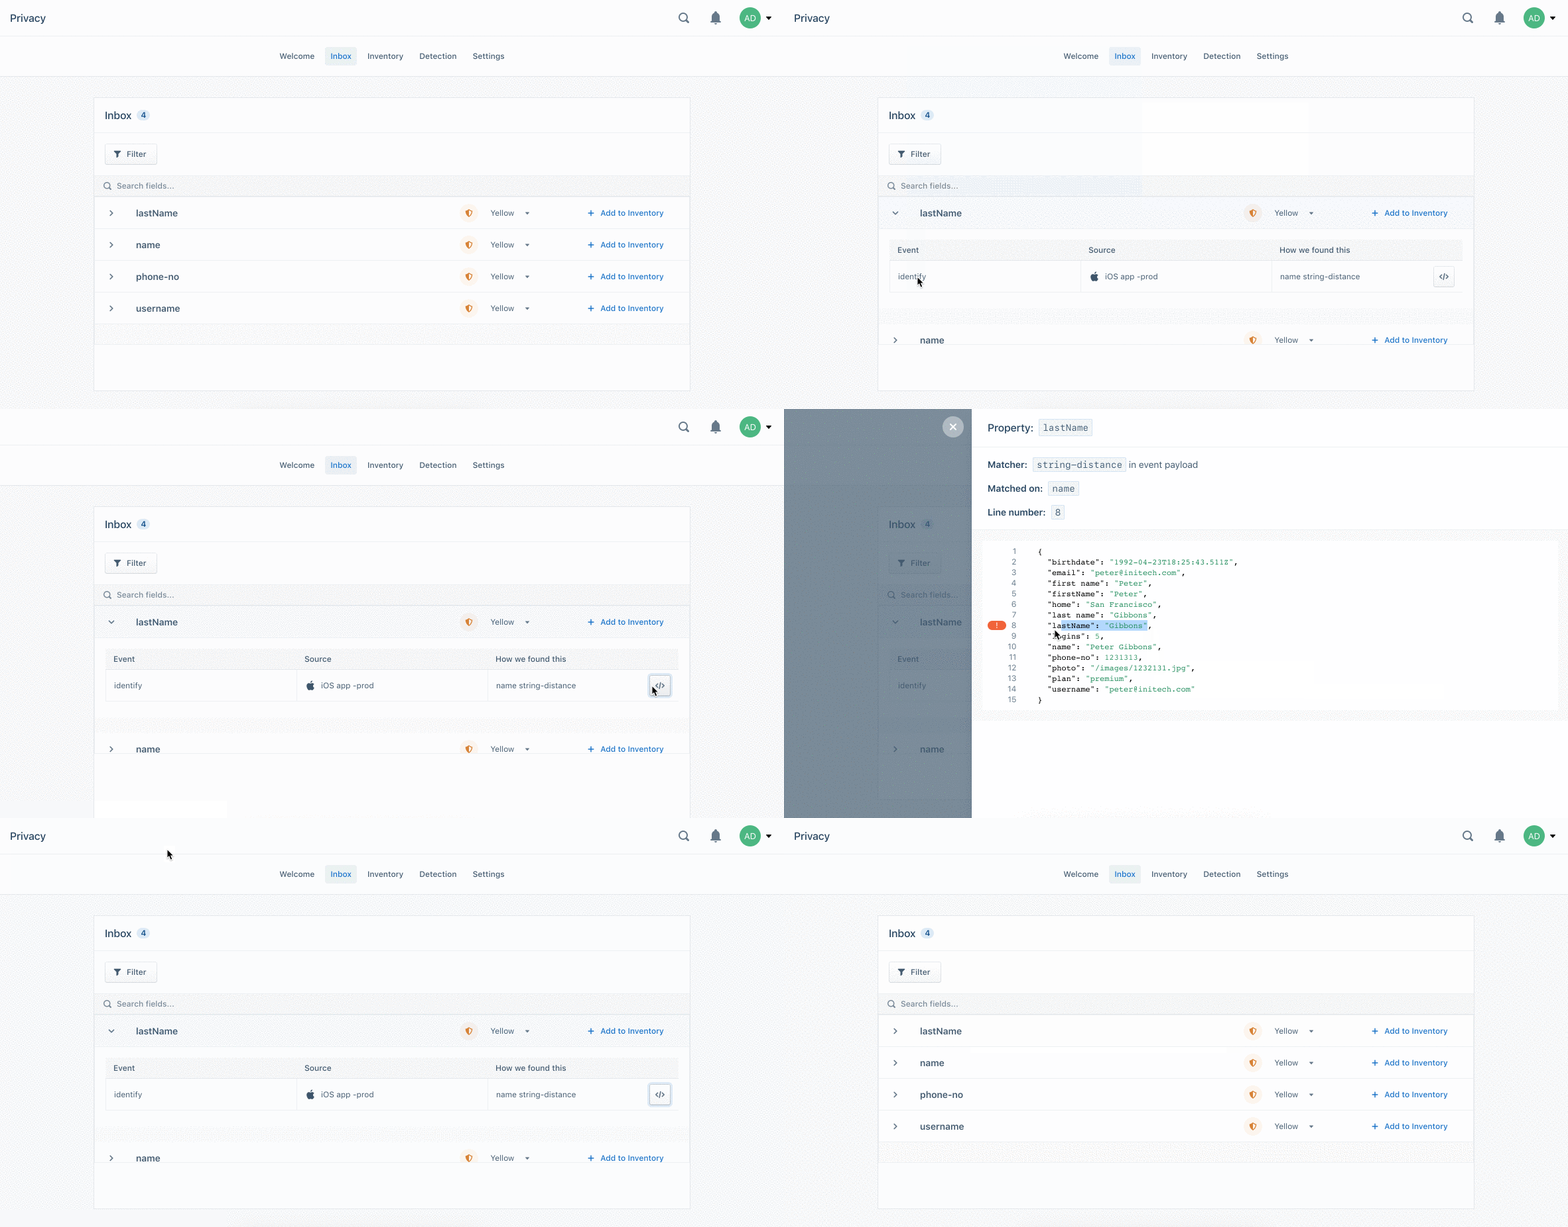
You can click a row in the Inbox to learn more about a field and where it was collected. The expanded view shows:
- which events contain the field
- which sources are sending the field
- which matcher (and what type of matcher) detected the field
- an example code snippet containing a payload that the field appears in
To streamline the classification process, Segment pre-classifies the data in the Privacy Portal Inbox as Red (likely highly restricted data), Yellow (likely moderately restricted data), and Green (likely least restricted data). These colors indicate how restricted the data is for your business. You can also send and block data from flowing based on its color classification and how restricted it is.
Segment makes recommendations about how a field should be classified using built-in PII matcher detection, however, you can always update the classification in the Inbox based on your company’s requirements.
Change a recommended classification
You can update the classifications to suit your needs by clicking on the color dropdown menu to change. For example, you might manually change a field that does not contain personal information in your implementation from a “Yellow” classification to “Green.”
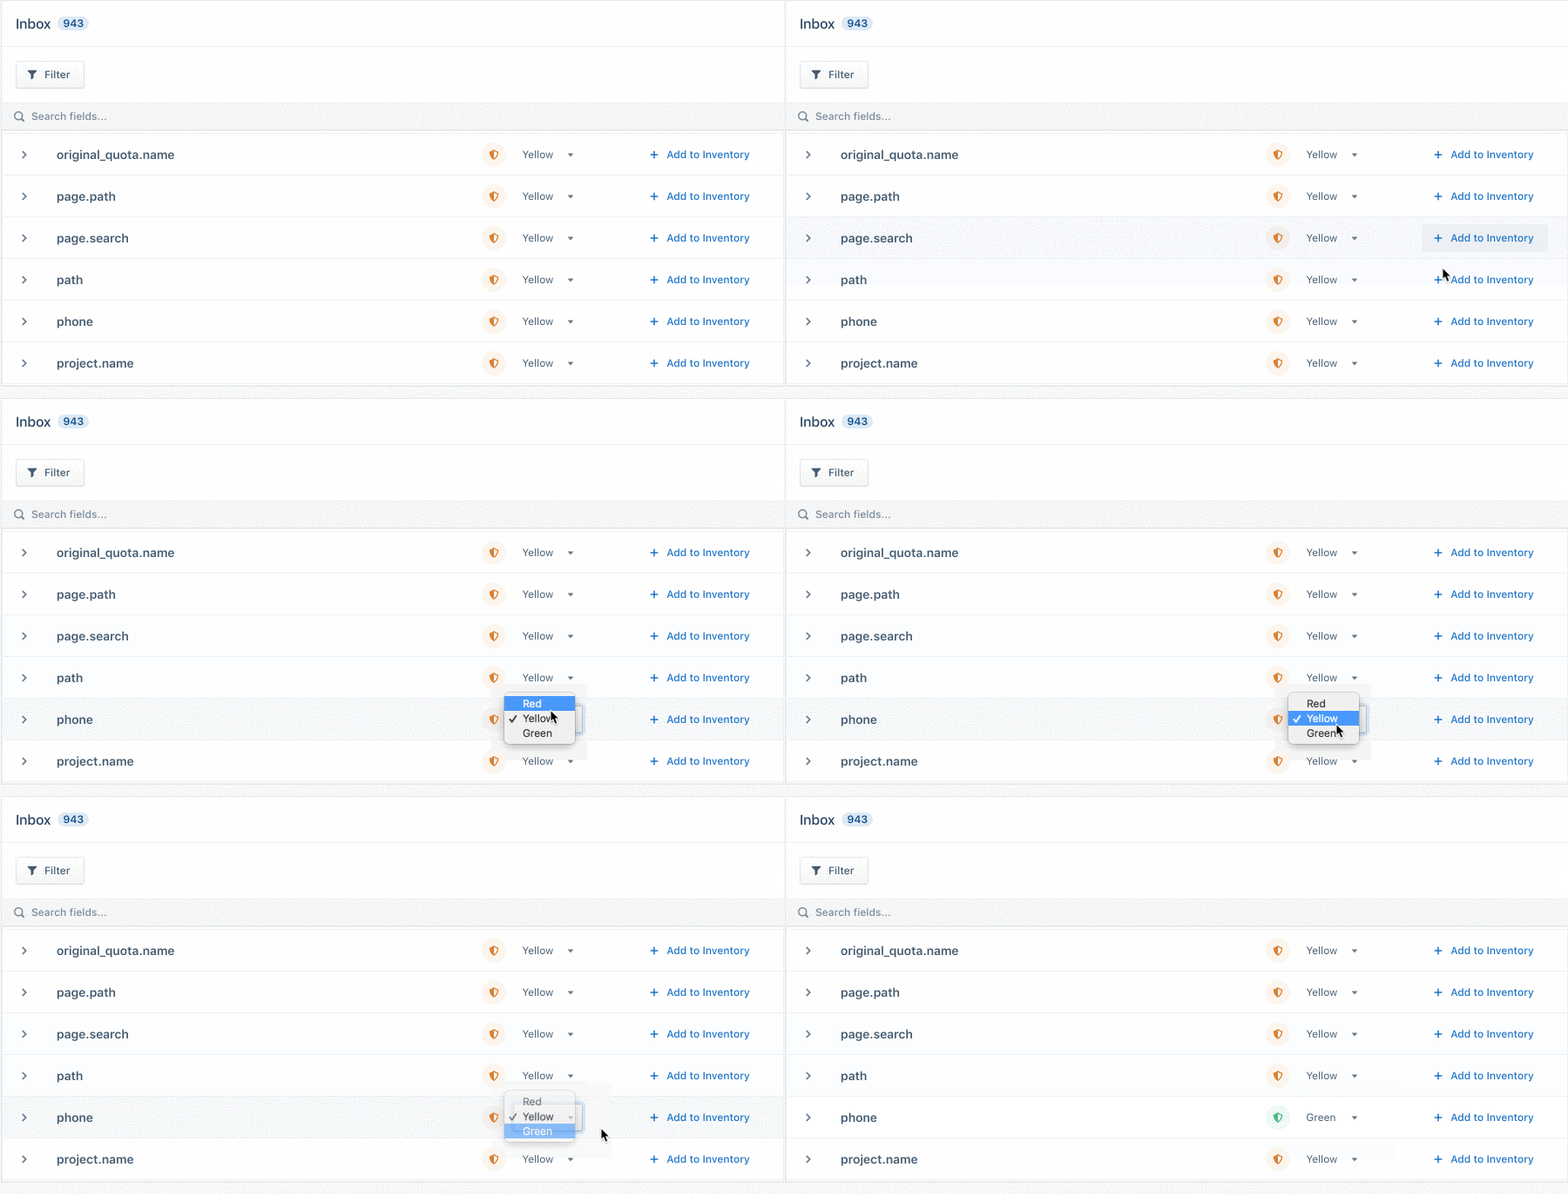
When you’re satisfied that the fields have been classified appropriately, you
can click Add to Inventory to officially apply the classification to the
field. This moves the field into your Data Inventory,
which is a central repository of all of the properties you classified as Red,
Yellow, and Green. Any time you send this field from a Web, Mobile, Server, or
Cloud Event Source — whether from another Source or event type — the Privacy
Portal automatically classifies it and adds it to the Inventory.
Understanding Classification types:
Red Classification: Fields that are classified as ‘Red’ are masked for users that do not have PII Access enabled. These fields are also blocked if you have set Standard Controls under Privacy > Settings section.
Keep in mind that if you have set Standard Controls to block fields from any of your sources, any new classifications you create in the Inbox will start to take affect immediately. For example, if you have a Privacy Control set up to block Red data from your Android source, any new fields you classify in the Inbox as Red will be blocked from entering Segment from your Android source.
Yellow Classification: Fields that are classified as ‘Yellow’ are masked for users that do not have PII Access enabled.
Green Classification: Classifying a field as ‘Green’ does not have any impact on the behavior of masking of fields within the Segment App, it is only available for the housekeeping purposes.
Once a field has been classified as “Yellow” or “Red”, marking it “Green” will not make it visible for users that don’t have PII access.
Privacy Inventory
The Inventory is a central repository of all of the properties you classified as Red, Yellow, and Green. Where the Inbox shows new, unclassified data with Segment’s recommended classifications, the Inventory only contains data that you explicitly applied Classifications to.
The Inventory is intended to be a Single Source of Truth so you can answer common regulatory questions about the data you’re sending through Segment, for example:
- What data am I sending into Segment, and how frequently?
- How restricted is the data I’m sending through Segment?
- Where is the data coming from, on a property-by-property level?
- Where am I sending this data?
- Who within my organization has access to each property within Segment?
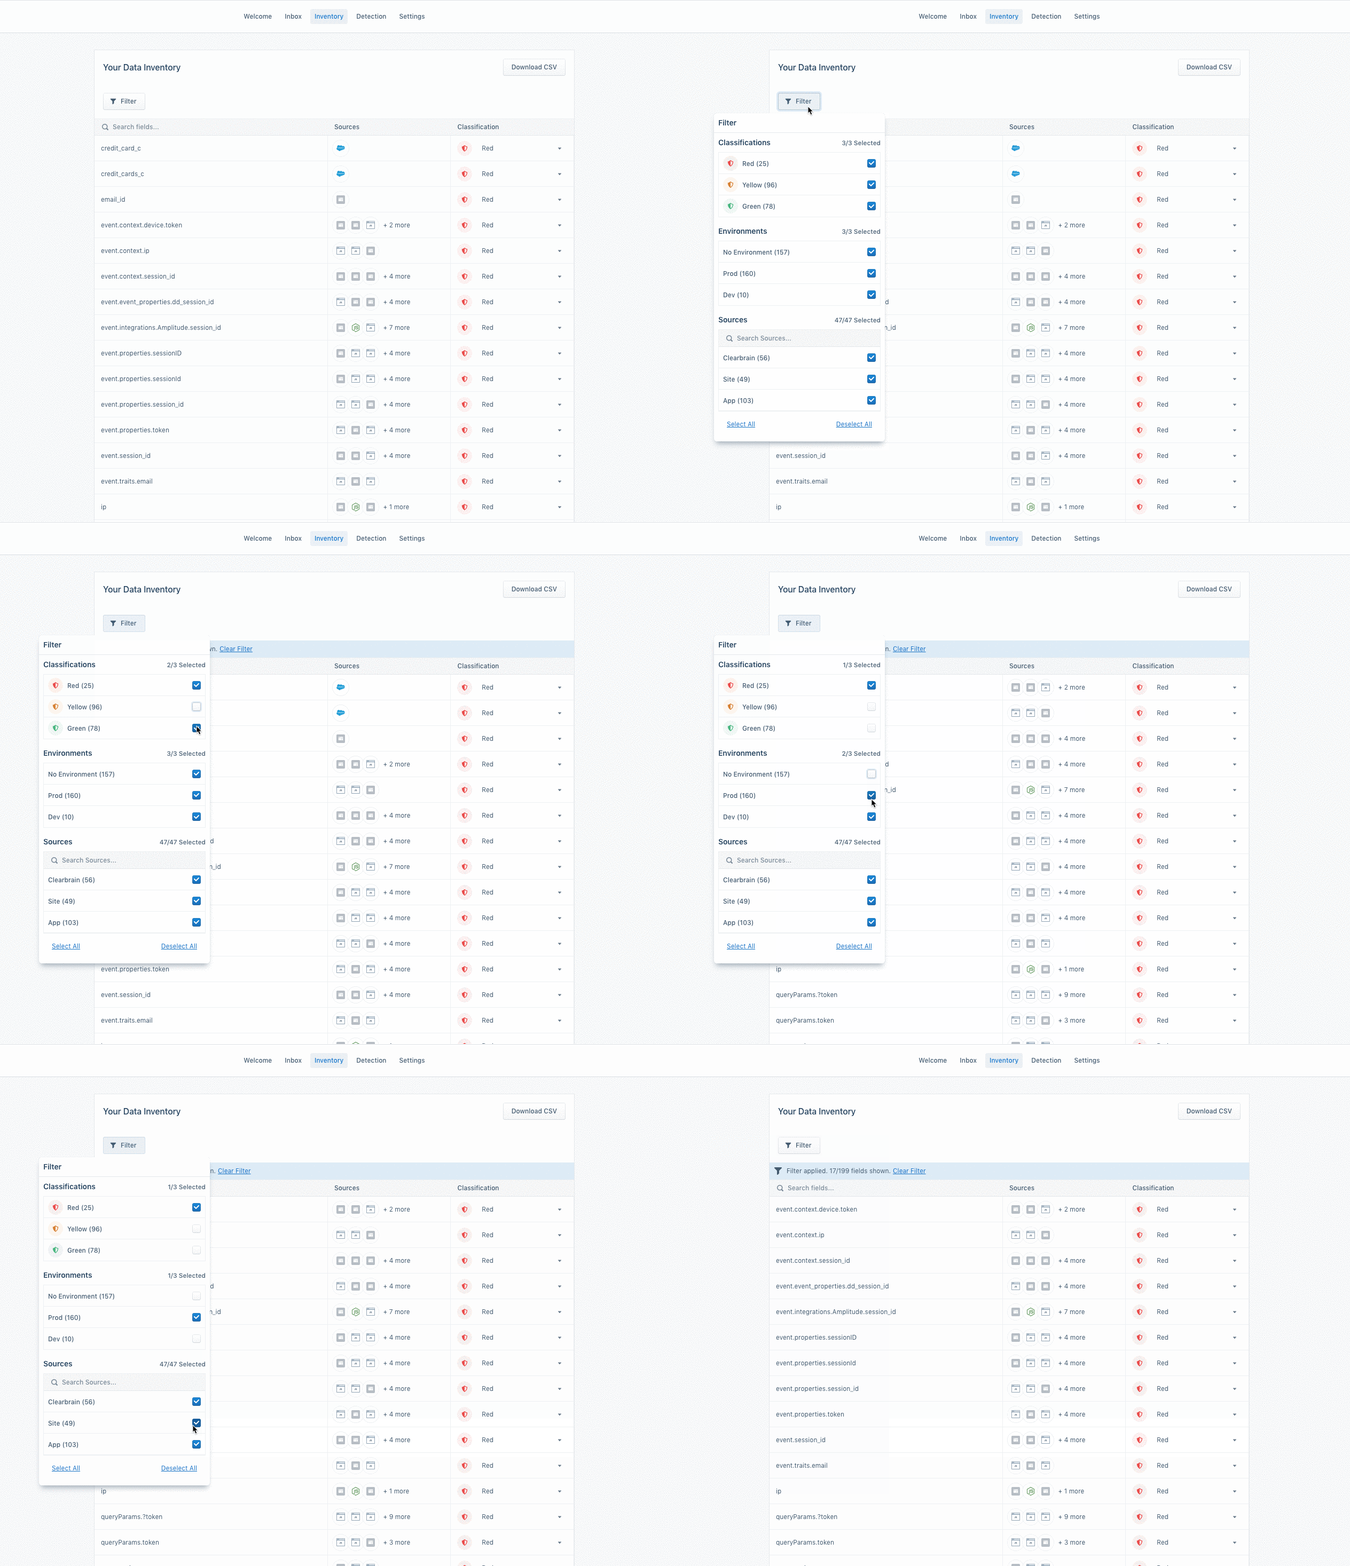
Once you’ve classified the fields as Red, Yellow, and Green in the Inbox, the classified fields appear in the Inventory. You can use the filter at the top left to filter down to specific categories of data (for example, Red data, data from a production environment, data from specific sources).
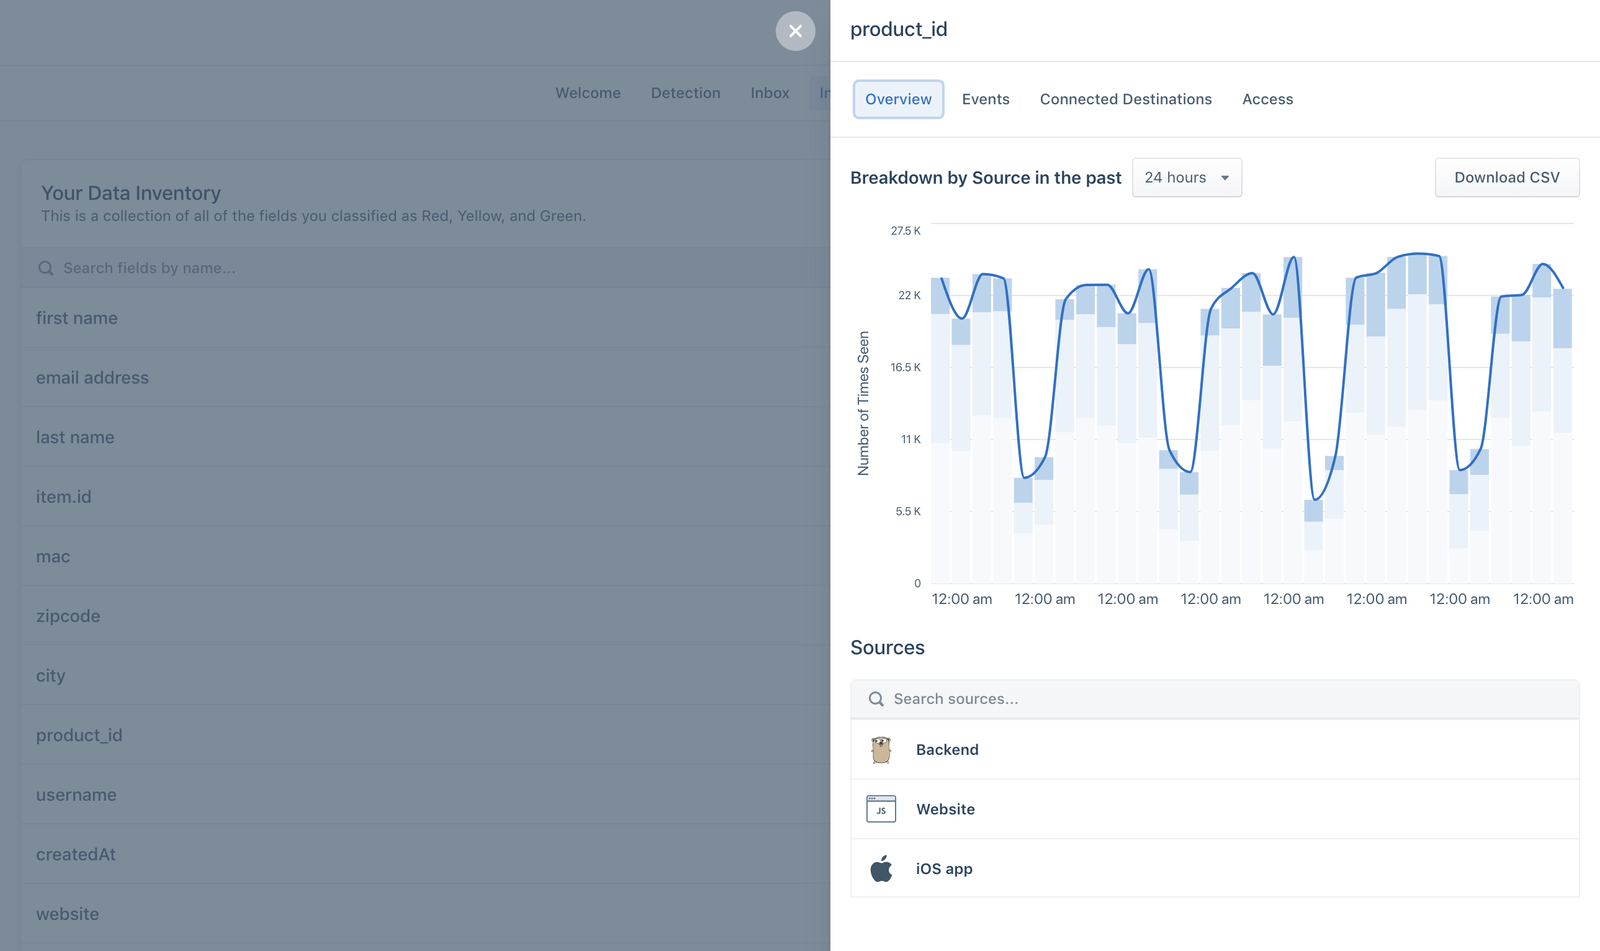
Click into a field (for example, ip) in the Inventory to open the Inventory
details. The details sheet displays how many times a specific field has been
sent from each Source it comes from. You can click the Events tab to see which
events contained the event, along with the Sources which sent the event. The
data in the side sheet updates in realtime, and includes a limited historical
view.
You can click Connected Destinations to see which Destinations are connected to the Source that contains the field. The Access tab displays a list of who within your organization has access to this field.
Finally, workspace owners can use the Download CSV button to export a CSV of their data Inventory to share with their Data Protection Officer (DPO), Chief Information Security Officer (CISO), legal teams, and more! Note that the CSV download button includes all data from your Inventory, and ignores any filters you applied in the UI.
This page was last modified: 01 May 2024
Need support?
Questions? Problems? Need more info? Contact Segment Support for assistance!